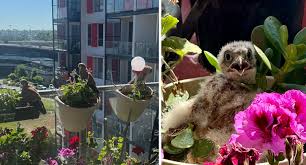
Residents of a high rise apartment protecting balcony plants from birds.
detect and drive away birds.
Hyderabad
Solution
| Component | Description |
|---|---|
| Technical Components | ### Technical Components Needed 1. **Microcontroller**: Arduino Uno or similar (e.g., Arduino Nano) to control the system. 2. **Ultrasonic Sensor**: HC-SR04 or similar to detect birds within 1.5 meters. 3. **Buzzer**: Piezo buzzer or similar to scare birds away with sound. 4. **LED**: Standard LED to provide a visual scare. 5. **Power Source**: 9V battery or power adapter (e.g., 5V USB power bank). 6. **Resistors**: For LED current limiting (e.g., 220Ω). 7. **Jumper Wires**: For connecting components. 8. **Scarecrow Structure**: Materials to build the scarecrow (wood, cloth, etc.). 9. **Enclosure**: To house the electronics (e.g., plastic box). 10. **Mobile App**: Optional, for viewing data (if data logging is implemented). ### Recommended Tech Stack 1. **Microcontroller**: Arduino Uno (compatible with C++ programming). 2. **Ultrasonic Sensor**: HC-SR04 (compatible with Arduino, easy to use). 3. **Buzzer**: Passive buzzer (can be controlled with PWM for different sounds). 4. **LED**: Standard 5mm LED. 5. **Power Source**: 9V battery with battery clip or 5V USB power bank. 6. **Data Logging**: Optional Bluetooth module (HC-05) or Wi-Fi module (ESP8266) to send data to a phone. ### Detailed Implementation Steps 1. **Circuit Assembly**: - Connect the ultrasonic sensor (VCC to 5V, GND to GND, Trig to digital pin, Echo to digital pin). - Connect the buzzer (positive to digital pin, negative to GND). - Connect the LED (anode through resistor to digital pin, cathode to GND). 2. **Code**: - Write Arduino code to read distance from the ultrasonic sensor. - If distance is less than 1.5 meters, turn on the buzzer and LED. - Optionally, count the number of detections and log data. 3. **Scarecrow Construction**: - Build the scarecrow structure with materials like wood and cloth. - Mount the ultrasonic sensor in one eye (ensure it has a clear view). - Mount the buzzer and LED in the mouth. - Place the Arduino and power source inside the body (ensure it is protected from weather). 4. **Testing**: - Test the detection range and adjust code as needed. - Ensure the buzzer and LED are loud/bright enough to scare birds. ### Required Technical Learning 1. **Arduino Programming**: Learn C++ basics for Arduino. 2. **Ultrasonic Sensor**: Understand how to measure distance using the HC-SR04. 3. **Circuit Basics**: Learn how to connect components (resistors, LEDs, buzzers). 4. **Data Logging (Optional)**: Learn to use Bluetooth/Wi-Fi modules to send data to a phone. ### Budget Calculation #### Hardware Costs: 1. **Arduino Uno**: $20 2. **Ultrasonic Sensor (HC-SR04)**: $3 3. **Buzzer**: $1 4. **LED and Resistor**: $0.50 5. **Jumper Wires**: $2 6. **Power Source (9V battery + clip or power bank)**: $10 7. **Scarecrow Materials (wood, cloth, etc.)**: $20 8. **Enclosure (plastic box)**: $5 9. **Optional Bluetooth/Wi-Fi Module**: $5 (HC-05) or $10 (ESP8266) **Total Hardware Cost**: $66.50 (without optional modules) or $76.50 (with ESP8266). #### Software Costs: 1. **Arduino IDE**: Free. 2. **Mobile App Development (Optional)**: Free (if using simple Bluetooth serial apps) or $0 (if not implemented). **Total Software Cost**: $0. #### Maintenance Costs (First Year): 1. **Battery Replacement**: $10 (assuming 2 replacements). 2. **Component Replacement (if damaged)**: $10 (estimate). **Total Maintenance Cost**: $20. ### Total Estimated Budget: - **Hardware**: $76.50 (with ESP8266). - **Software**: $0. - **Maintenance**: $20. - **Total**: $96.50. |
| Key Features |
Feature: detect a bird and buzz
Format: detection device Usage: switched on to perform this.
Feature: record number of birds chased away
Format: data collected Usage: viewed on the phone |
| Implementation Steps | connect the circuit with ultrasonic sensor as input and a buzzer and led as output. Use a basic arduino. Write the code to detect a flying object within a range of 1.5 metres. the ultrasonic sensor should be able to cover the height of around 2.5 metres. The led and buzzer are on when the sensor detects a bird. prepare the structure of a scarecrow. place an ultrasonic sensor in the eye of the scarecrow. place a buzzer and led in the mouth. house the the circuit and casing in the body of the scarecrow. Place the battery or a power source |
