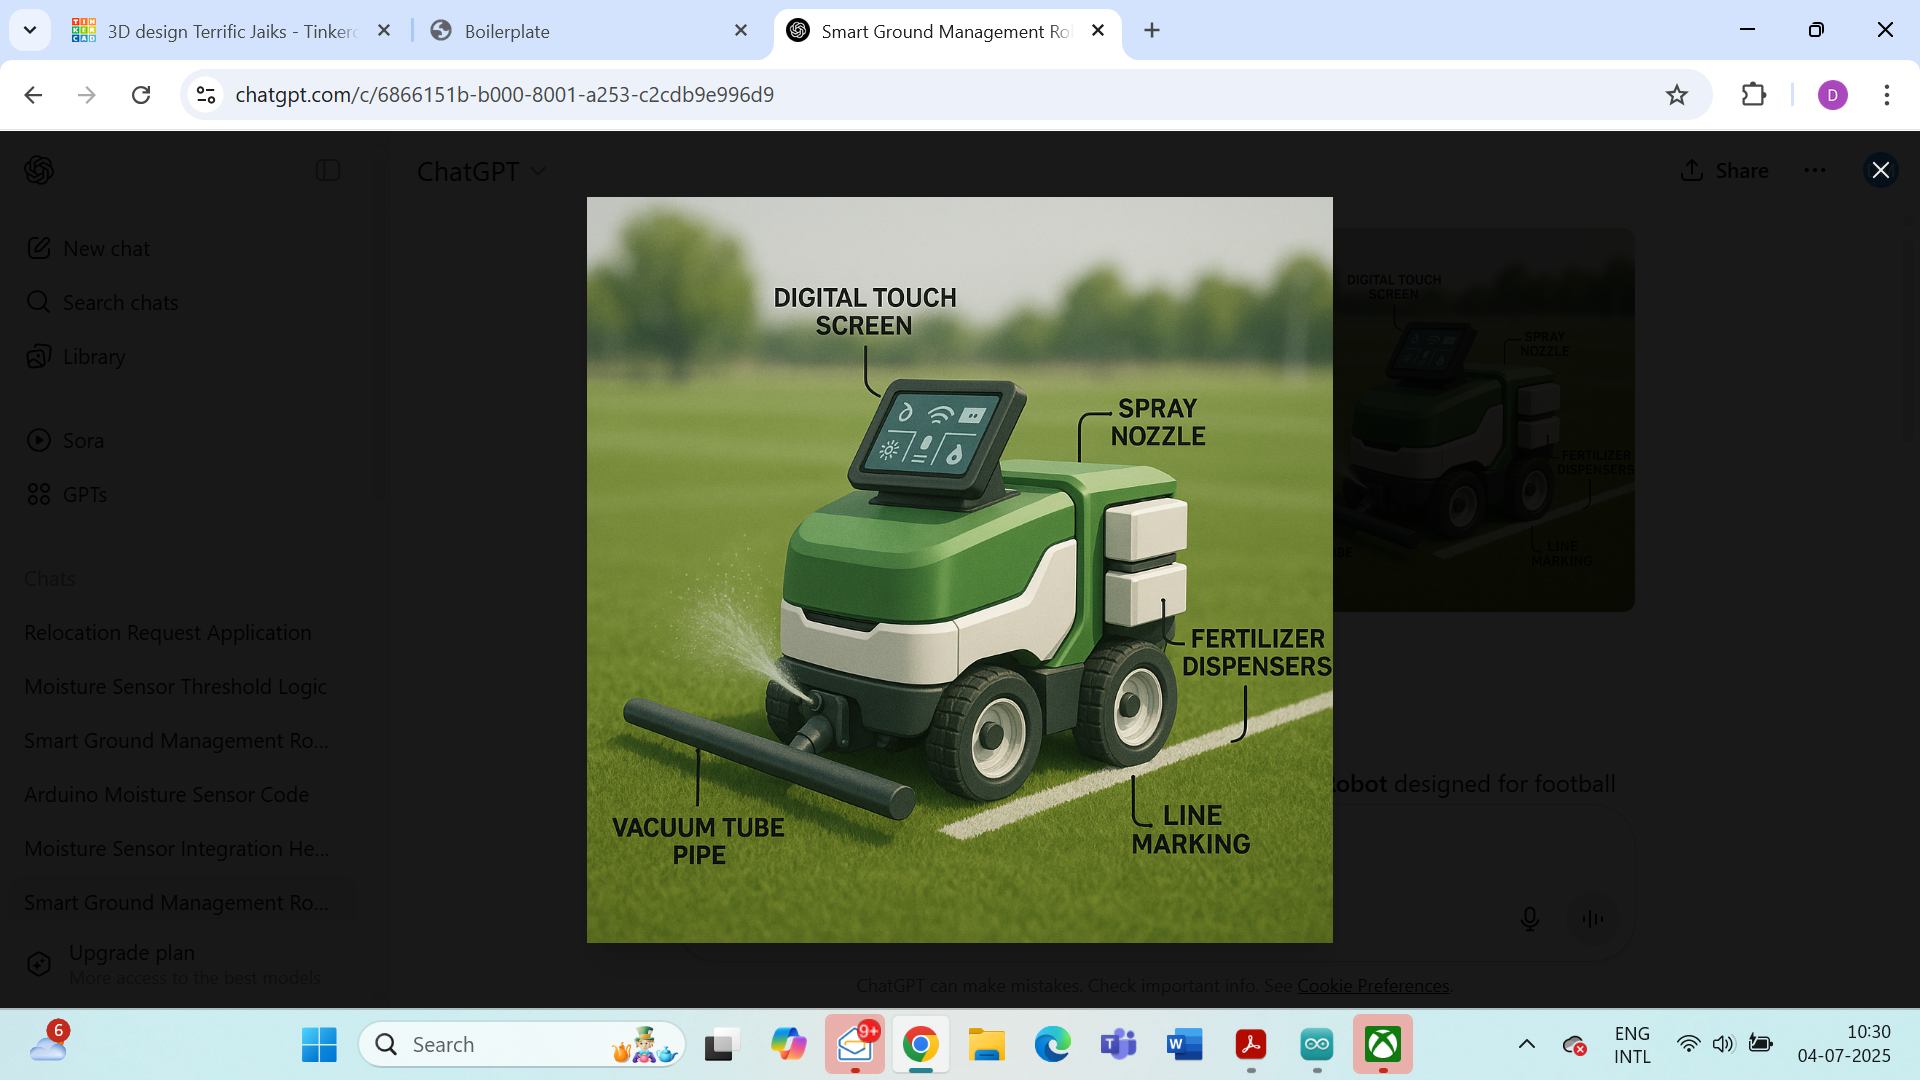
During practice of football , during wind the dust blows and goes into my eyes which is affects my eye site m

By watering and cleaning the ground

Sarlanagar Maihar (MP) India

Solution
Component Description
Technical Components ### 1. Technical Components Needed #### Hardware Components: 1. **Soil Moisture Sensors**: To detect the moisture level of the ground to avoid over-watering. 2. **Weather Sensors**: To detect rainfall and adjust irrigation accordingly (to use collected rainwater). 3. **Motion Sensors/Cameras**: To detect if someone is playing on the ground (to stop all operations). 4. **Sprinkler System with Valves and Pumps**: For watering the ground with spray. 5. **Vacuum Tube System**: For dust particle removal (could be robotic cleaners with dust sensors). 6. **Fertilizer Dispenser**: Programmable to avoid continuous dispensing. 7. **Digital Touch Screen**: Mounted at the ground’s entrance or nearby, with relevant sensors for displaying information. 8. **Water Storage System**: For rainwater collection and irrigation. 9. **Microcontroller/PLC/Server**: Central unit to control all operations and sensors. 10. **Mobile App Backend**: To receive and send notifications/controls. 11. **Wi-Fi/Bluetooth Modules**: For connectivity with mobile app and other components. #### Software Components: 1. **Mobile App**: For remote control and notifications. 2. **Firmware**: For microcontrollers/sensors. 3. **Control Algorithms**: For sprinklers, dust cleaners, and dispensers to operate based on sensor input and not continuously. 4. **Cloud/Database**: To store sensor data and operational logs (optional for advanced analytics). ### 2. Recommended Tech Stack #### Hardware: - Microcontroller/PLC: Arduino/Raspberry Pi/ESP32 (for smaller setups), industrial PLC (for larger professional setups). - Sensors: Off-the-shelf soil, weather, and motion sensors compatible with the microcontroller/PLC. - Sprinkler/Pumps: Typical irrigation system components with electronic valves. - Vacuum/Dust Cleaning: Custom robotic vacuum-like system or adapted from existing dust-cleaning robots. - Fertilizer Dispenser: Custom or adapted from agricultural systems. - Digital Touch Screen: Commercial-grade display with touch input. #### Software: - Mobile App: Cross-platform (Flutter/React Native) or native (Android/iOS). - Backend: Node.js/Python/Java for server-side logic. - Database: SQLite (for local microcontroller storage) or Postgres/MySQL (for cloud storage). - Communication: MQTT/HTTP for device-to-server communication. - Cloud: AWS/Azure for hosting backend, if needed. ### 3. Detailed Implementation Steps (Ordered as Features Listed) 1. **Watering the Ground**: - Install soil moisture sensors strategically across the ground. - Connect sensors to the microcontroller. - Install sprinklers with controllable valves. - Write software to turn on sprinklers only when soil moisture is below a threshold (and when no one is playing). 2. **Vacuum Tube Dust Prevention**: - Install dust sensors to trigger vacuum system. - Implement a robotic vacuum system or fixed suction points connected to a central vacuum. - Start cleaning when dust levels are high (and no one is playing). 3. **Fertilizing the Ground**: - Install a fertilizer dispenser with controllable output. - Program it to dispense based on a schedule (e.g., once a week) and not continuously. 4. **Digital Touch Screen**: - Install a display with touch input. - Connect it to the microcontroller to display real-time ground status (soil moisture, dust levels, weather). 5. **Rainwater Collection**: - Set up a rainwater collection system with storage tanks. - Use pumps to feed water to the sprinklers, prioritizing rainwater over mains supply. 6. **Mobile App Control**: - Develop a mobile app with controls for manual override, alerts, and real-time ground status. 7. **Common Safety Logic**: - Integrate motion sensors/cameras to detect if someone is playing. - Ensure all systems disable actively when motion is detected. ### 4. Required Technical Learning 1. **Microcontroller Programming**: Learn Arduino/C++ or Python for Raspberry Pi. 2. **Sensor Integration**: Understand how to interface with various sensors and interpret their data. 3. **Irrigation System Design**: Learn about sprinklers, valves, and pumps. 4. **Robotics**: If building a custom vacuum system. 5. **Mobile App Development**: Learn Flutter/React Native or native SDKs. 6. **Backend Development**: Learn server-side programming and basic database management. 7. **Cloud APIs**: If cloud-based logging/control is desired. ### 5. Budget Calculation #### Hardware Costs: 1. Soil Moisture Sensors: $10 x 10 = $100 2. Weather Sensor: $50 x 1 = $50 3. Motion Sensors/Cameras: $30 x 4 = $120 4. Sprinkler System and Valves: $300 5. Vacuum System: $500 (estimate for custom solution) 6. Fertilizer Dispenser: $200 7. Digital Touch Screen: $150 8. Water Storage and Pumps: $400 9. Microcontroller/PLC: $100 (Arduino/RPi) 10. Wi-Fi/Bluetooth Modules: $50 **Total Hardware Costs**: ~$1,970 #### Software Costs: 1. Mobile App Development: $2,000 (initial development cost, no ongoing subscriptions assumed) 2. Backend Hosting: $0 (assuming local server) to $20/month (cloud) = $240/year 3. APIs: No 3rd-party APIs assumed here. **Total Software Costs**: ~$2,240 (first year) #### Maintenance Costs (First Year): 1. Routine Maintenance (cleaning, part replacements): $500 2. Software Updates: $300 **Total Maintenance Costs**: ~$800 #### Total Estimated Budget: **Hardware**: $1,970 **Software**: $2,240 **Maintenance**: $800 **Total**: ~$5,010 (Note: Hardware costs are highly variable depending on quality and scale. Professional systems could be significantly more expensive.)
Key Features
Feature: watering the ground
Format: with spray
Usage: to wet the ground
Feature: vacuum tube pipe
Format: with vacuum
Usage: to prevent dust particles
Feature: fertilizing the ground
Format: with dispenser
Usage: to grow grass
Feature: digital touch screen
Format: with sensor
Usage: for information
Implementation Steps Order should as a the features listed
Mahimna12#

Rated: 5 stars

Review: We can start this with connecting Bluetooth module connecting to the Arduino and using the robotic car which is already there at the school. Lets get on a video call to take it further